Pages

Monday, August 29, 2011

pastel dot flowers

Difficulty: 2 /10
You will need:
- light blue (I used Manhattan by NYC)
- pastel pink (I used Pink Chiffon by Revlon)
- light lavender
First off, put a few coats of your light blue on each finger of one hand, and use the pink on the other. next, on the hand with the blue, put a pink dot in the center of the nails, and on the other hand, put a lavender dot. finally, put lavender dots around the pink dots, and light blue dots around the lavender dots. sorry if that was confusing. look at the pictures for reference.

Saturday, August 13, 2011

candy coated in spots

Difficulty: Intermediate / 5 out of 10
You will need: Black, a small brush, bright pink, red, and light green
For this one, I didn't take a picture of each step because when I finished the pointer finger, I decided not to keep this one on. I mean, I like it, but it's not what I was looking for. Anyway, you start with a base of black, and put a criss cross pattern of red over it with the small brush. On the remaining black parts, put a green dot. Finally, at the places where the red lines intersect, put a pink dot.

Thursday, August 4, 2011

White flowers

Difficulty: easy - intermediate / 4 out of 10
You will need:
- White
- a small brush
- rhinestones (optional)
- light green/lime green or a goldenrod color
- pail pink ( I used Claire's mello/crazy mood)

Hello Again! Sorry about the delay in the flowers. I know it was the vote winner like forever ago, but I didnt have a good enough green, for what I was planning on doing. I finally decided to do this, and it came out great! So You start with a few coats of Claire's mellow/crazy mood polish. It turned out pink this time! YAY!!! I love this color.
After that, you us a small brush to put little white pedals to make the flower as shown. This was hard for me to do with my right hand, cause I'm left handed.
I couldnt do my whole hand like this for the picture, because if I had, it would have dried before I could put the rhinestones in. Any way, you put a small dot of either a light green, or goldenrod in the center of the flower.
You could leave it without the gems if you dont have gems, but I like it with. You put the rhinestones in the green or goldenrod dots before the dots dry. Thanks for reading. Hope you like it! :)

Thursday, July 28, 2011

Racing Stripes


Difficulty: easy / 4-10
You will need:
- red (I used red red by wet 'n' wild shine)
- black
- white
- a very small brush

 Sorry I haven't posted in a while. I'm going to try a new format for my posts. I'm gonna put a picture of each step. In each picture, the pointer finger will be completed to show the finished product. I'll do a few posts like this and if you post a comment and tell me you like it, I'll keep doing it. Anyway, for this one, you put a base coat of red, with a vertical black stripe right down the middle.
next, use the small brush, and put a white stripe on either side of the black one as shown. If you like you could leave it like this.
And, Last but certainly not least, We have GLITTER! put about two coats of glitter, only over the stripes, And your manicure is complete! Hope you like it ;D

Monday, July 18, 2011

dark purple ferns


Difficulty: intermediate- slightly difficult / 6 out of 10
You will need:
- Manhattan by NYC or some other color that is very similar.
- Rock bottom by Sally Hansen hard as nails
- mellow-crazy Claire's mood polish. It almost always shows glittery lavender. it only doesn't when it's REALLY hot out, you've been under a lot of blankets, or when under hot water.
- small brush
The reason I'm specifying brands and specific shades, is because these ones work PERFECTLY! The picture doesn't do it justice!

To start off, put a few coats (about three or, maybe even four to make sure that it is as dark as can be) of Manhattan by NYC for the background. Then put a small section in the bottom left or bottom right corners of all of your nails in rock bottom. make them all the same. Then put several little slightly curved or wavy lines in the same color coming out of that section to look a bit like a fern. Then do the same with the lavender polish, inside of the other lines, slightly smaller. Finally, put more lines in the rock bottom going between the lavender. Put some top coat on to make is shinier, and you have a masterpiece! I hope you like it

Candy Coated

Difficulty: easy intermediate / 4 out of 10
You will need:
- white
- red (I used red red by wet 'n' wild shine)
- three or four other bright colors
- a very light pastel background color (I used Chiffon pink by Revlon)
- a small brush

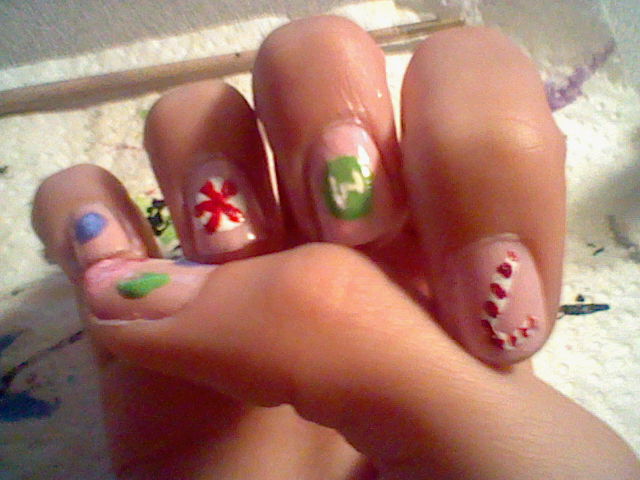
Sorry I haven't posted in a while. I've been away at girl scout camp for a week. I painted my nails once while I was there(I know it sounds odd that I painted my nails at girl scout camp, but I did), but it got way to chipped for me to take a picture of it when I got back home again. oh well... Anyway, for this one, start by doing a few coats of the pastel color. Now I'll explain how to do a few pieces of candy:
Candy cane: This one is really easy. You just use a small brush to draw a white line with a curl on the end, shaped like a candy cane. Then when that dries, just put a few little spots of red at even intervals, just like a candy cane.

Runts: For this one, take a few bright colors like red, yellow, green, blue, or orange, ad paint simple shapes that look like bananas, or lemons, or cherries, etc...

hard candy: This one is the easiest. just put a big circle of a color, then with a small brush, put a tiny white line, close to one edge. for a peppermint hard candy, make a white circle with red lines leading from the outside edges into the middle of the circle.

M&M: put a medium circle, then put a white M in the middle with a small brush

Gum drop: This is very much like a hard candy, only its flat on the bottom, and sort of straight on the sides with a rounded top.

Who ever gave me this idea, thanks. It worked out REALLY well!

Thursday, July 7, 2011

Paw prints

After I did the ivy French, I did this one. I had tried this once before, but I made it all to crowded together.
 Difficulty: easy / 3 out of 10
You will need:
- red
- black
- a very small brush 
The thing that makes this one easy is the fact that it's just a series of dots. You start with a background of red, then add about seven to eight dots up the center of the nail in a skinny S shape. That's where I went wrong the first time I tried this. I put to many dots to close together. Then inside the curves, put a really big dot as shown in the picture. Finally, put three dots on the open side of the S shape. Make these dots slightly bigger than the first dots you made. This would also look good with a background of a medium green, or a blue, or possibly white.

ivy french

Difficulty: Easy-intermediate / 4 out of 10
You will need:
- green
- light blue
- very small brush
This one I applied then immediately removed, because it wasn't very clear. I'll probably try again some time in the future. I think I need a darker green. But still, Here's some instruction on how to do it anyway. Put a blue background, with a green French tip. then draw a green wavy line coming from the French tip. Be careful not to make the line to thick. You can branch off of this one one or two times. Then put little green dots on the sides of the lines for leaves.

Tuesday, July 5, 2011

Musical fingers

 Difficulty: intermediate / 4-6 out of 10
Hey readers. Sorry for the lack of a picture. I did this one a while ago, and don't know where the picture is. All you have to do to draw this design is to look up treble clef, base clef, musical rests, etc... online. I just painted my nails a light pink to match my outfit (I was playing in a piano recital. I played two songs from Lord of the Rings; Rohan and Many Meetings.) I recommend using white as a background instead. Anyway, I just painted notes, rests, symbols, and clefs.

Monday, July 4, 2011

Crackle success

Hey! I used the crackle polish today, and it works really well! The issue is that if you dont put top coat over it after it cracks and is dry, sections of it will fall off. Also, you have to be careful about layering it, because once it is cracked, you cant go back over it, or it wont work as well. you have to make sure that you have plenty of paint on your brush before starting. Here's a pic

As you can see, it turned out pretty well! I wonder what this would look like with matte? I'll have to try that some time.

Sunday, July 3, 2011

patriotic glitter

Sorry about glare. 
 Difficulty: easy / 2 out of 10
You will need:
- bright blue
- red
- glitter top coat

Start by painting your nails alternating blue and red as shown in the picture. then, when that dries, simply put a streak of glitter top coat on one of the sides as shown. if you have silver gems, put a good sized dot of glitter top coat on the streak on the blue nails, and stick the rhinestones straight in. It works better than gluing them in. trust me.

Two new Polishes

Hey! I just went to a beauty store yesterday called Ulta, and by the way, everything there is too Expensive! Anyway, I got Two polishes. One is a cool lime green sort of color by China Glaze. It's called Entourage.


 The second polish was a black crackle top coat by Sally Hansen. That would look really cool with a neon, or neon gradient background! I'll get back to you on how well it works